Image Map
Showing posts with label Totally Transformed. Show all posts

Sunday, August 9, 2015

{FREEBIE} Totally Transformed: Pez Dispensers {Updated}

Last summer I introduced a mini-series on my blog where I took everyday objects and totally transformed them. I really need to get back to this series this year because I absolutely loved it! 

Today I am throwing it back to one of my previously transformed items and adding in a corresponding freebie worksheet for you! Be sure to read all the way to the bottom to grab the freebie.

One of my favorite resources to use in my kindergarten classroom are CVC sliders. They really help isolate each sound and get across the blending action. I use all kinds of sliders but sometimes the paper ones just don't add that wow factor to hook my learners. In order to solve that problem, cue the transformation...


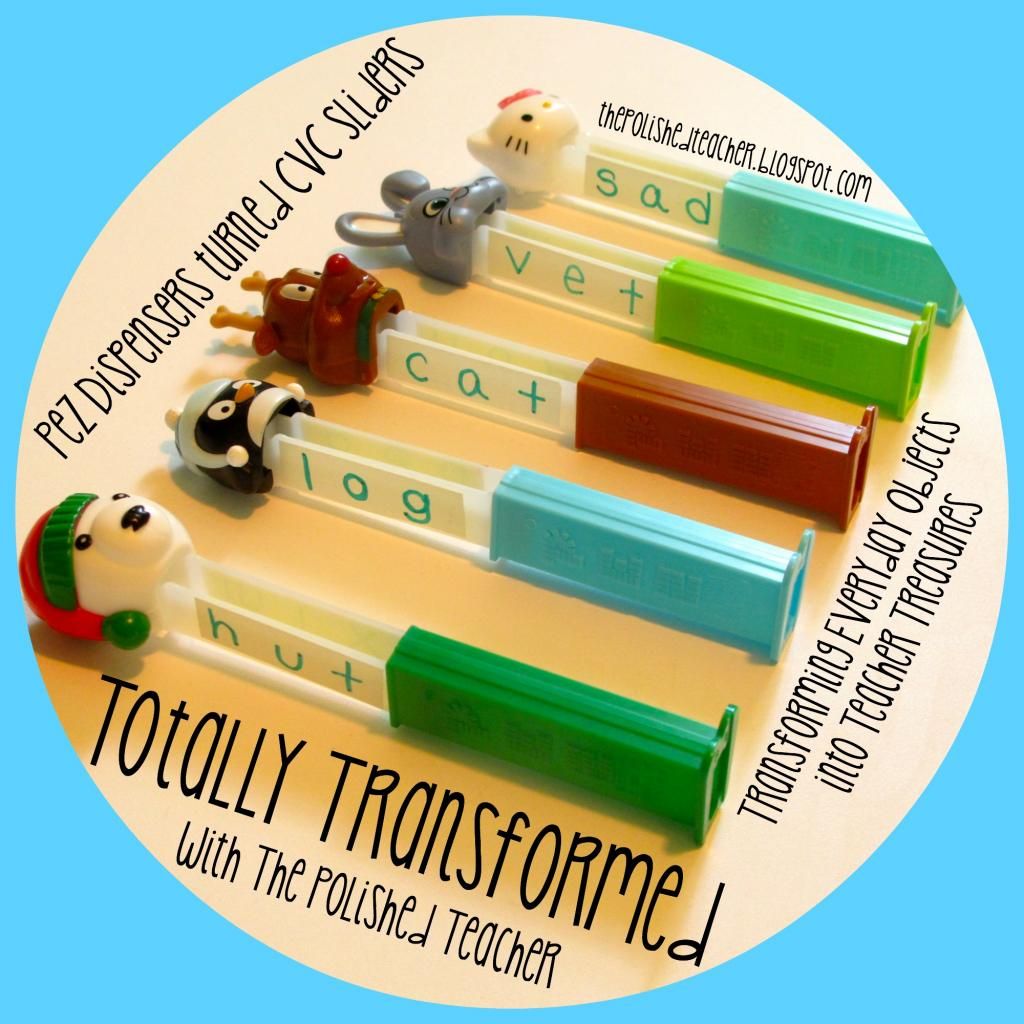
That's right! Pez Dispensers are my favorite way to use CVC sliders in the classroom! I can easily hook my learners by introducing different holiday themes or favorite movie characters.  I'm thinking this year these Minion themed dispensers would be a huge hit after the summer movie success! What little one would not be rushing to complete this center activity if they got to play with these adorable Minions? 


These are the easiest to put together and don't require spending a ton of money on ink and lamination. These are perfect for the kinestetic learner and you never have to worry about mixing up any pieces during a center activity. I always ask for Pez Dispenser donations from parents and purchase on after holiday clearance when I can get them for 25 cents or less. Here are the steps on how I made my CVC sliders. 


The words can easily be changed out whenever you want to mix it up. You can ever add the picture to the other side of the slider if you want to make it self correcting. This shows your students how you can make anything from their real lives into a learning experience. However, most of all, it makes learning FUN which is a must in my kindergarten classroom! 

I created this quick little freebie for you all that corresponds with the Pez Dispenser CVC sliders that would be perfect to use as a literacy center, during guided reading, or as a fast finisher drawer. 

To download this freebie, just click on the picture below. 

https://drive.google.com/file/d/0B_VEQ_wwEooLTlo0VGozX2VDU0k/view?usp=sharing

The kids slide the Pez sliders out one letter at a time and write one letter per box. After blending the sounds together, they illustrate the word in the circle. 

I really hope you find this idea useful as it is a huge fan favorite in my classroom and I know it will be with yours as well! If you do re-create these, I'd love to see how you use them in your classroom! Be sure to tag me on instagram so I can see what you created!

Sunday, June 15, 2014

Totally Transformed: Pez Dispensers

This week I am back again with another Monday Made It edition of "Totally Transformed". Last week's project of transforming the Dollar Spot bags was a huge hit! If you missed it, click the picture below to check it out! 

http://thepolishedteacher.blogspot.com/2014/06/monday-made-it-totally-transformed.htmlhttp://4thgradefrolics.blogspot.com/
   
On the menu this week: transforming Pez dispensers into CVC sliders. I have been a collector of Pez dispensers since I was a child. I knew there had to be a fun way to transform these childhood favorites into a teaching tool.


Student teaching in kindergarten, a HUGE focus of the year was with CVC words. We used "Stretchy the Snake" a lot in the classroom! However, envelopes and pencil boxes can only hold the attention of a 5 year old for so long. By adding in simple character faces on a Pez dispenser, children will be instantly engaged! For example, if you have a child who loves Star Wars? No problem! Grab a Darth Vader Pez dispenser and you are golden!

Let's see the breakdown...


This project was as simple as adding two pieces of tape and writing three letters on each side. By adding the piece of tape, you have a teaching tool that can be used over and over again! However, if you don't plan on reusing these, you can skip that step and write directly on the Pez dispenser. This was seriously one of the easiest projects I have ever done! Gotta love 5 minute DIY's!

~~~~~~~~~~~~~~~~~~~~~~~~~~~~~~~~~~~~~~~~~~~~~~~~~~

While you are here, I also "made" a linky party called "Font-astic Favorites". It's perfect for all you font obsessed teachers out there! If you have a chance, I would love for you to link up! Click the picture below to join in on the fun!

http://thepolishedteacher.blogspot.com/2014/06/font-astic-favorites-tag.html

See you next week when I tackle another everyday object and turn it into a teaching treasure!

Monday, June 9, 2014

Monday Made It - Totally Transformed

Welcome back to another Monday Made It hosted by the lovely Tara at 4th Grade Frolics!


This week I am kicking off a new series of Monday Made It posts on my blog:
Totally Transformed
Hopefully it will be the solution to end my craft fails! During this series, I am going to take an everyday object and totally transform it into something new. 

For today's transformation I turned to my trusty sidekick: Pinterest. While it might be summer, teacher's never turn off their school brain. After seeing these on Pinterest...


I knew I just had to make some fancy new wall art for the classroom! If you are like me, you fall in love with wall art at places like Hobby Lobby only to discover it costs upwards of $30 for a single canvas. Have no fear, I am here to show you a much cheaper way to get top notch wall art! For the final product, each canvas cost under $1.50 to make after using coupons. 

Let's take a look at the break down:


Feel free to pin any of my Monday Made It creations on Pinterest that you might like to tackle in the future! We all know it is where most of my crafting ideas come from!

The process to turn these canvas bags into wall art takes just a few simple steps. If you are a teacher hoarder and Target fanatic like myself, odds are you will have all these things at your disposal.


To make six of these bags it took less than an hour. My favorite part, there was no wait time for things to dry like with other crafting projects. It was as easy as cut, tack, hang. The even have the strap already attached so they can easily be hung on the wall. Here are the final products in all their glory...


As you can see, I had a newer (2014) and older (2013) version of each bag. I know I have the original (2012) bags from the Pinterest page if I dig through my closet hard enough. I have been diligently collecting these bags at Target. I always buy at least 2 of each bag when I go to the Dollar Spot because I never know when I might need more than one and they are always sold out. Good thing I bought duplicates because now I have beautiful wall art and bags to use in the classroom. I cannot wait until the new set of bags come out so I can continue to add to my collection!

Hope you enjoyed this tutorial! Thanks to Fancy Frugal Life for the inspiration for this project! See you next week when I tackle another Totally Transformed project!
Pin It button on image hover